

How To Reinstall Windows Office 2010
Excel 2010 Give-and-take 2010 Outlook 2010 PowerPoint 2010 OneNote 2010 Office 2010 Part.com More than...Less
Important: Role 2010 is no longer supported . Find out what your options are here. If yous notwithstanding need to install this version, you lot'll need an Office 2010 installation disc and a product key for the version you're trying to install.
Because of potential backward compatibility issues the default installed version is 32-scrap. However, if the 64-chip version is a better choice, follow the 64-chip installation procedure in this article.
To do a custom install or uninstall for specific apps, see the section below Install or remove individual Office programs or components.
Install 32-bit (default) Office 2010
-
Insert the Office 2010 disc into the drive. If the setup wizard doesn't first automatically, navigate to the disc drive and click SETUP.EXE.
-
When prompted, enter the product key.
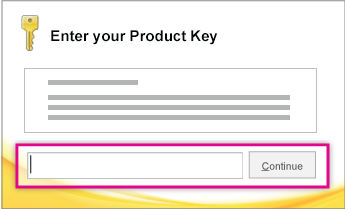
If you demand help, see Discover your production key for Office 2010.
-
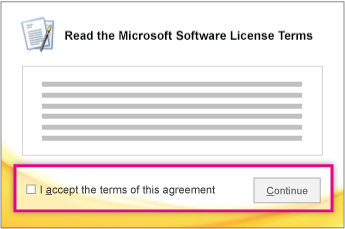
Read and have the Microsoft Software License Terms, and and then click Go along.
-
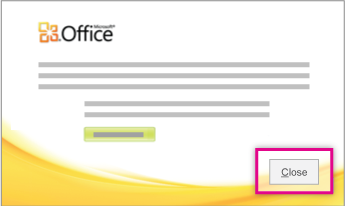
Follow the prompts and after Office installs, click Close.
-
In the Activation sorcerer, click I want to activate the software over the Internet, and then follow the prompts.
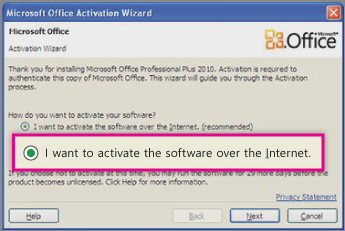
Yous'll need to activate Office to go along your Office programs filly working. If you don't activate it when yous install, you can actuate it later from an Office application by clicking File > Assistance > Activate Product Primal.
For more information, see Activate Part 2010 programs.
Install 64-bit Part 2010
What yous demand to know before installing 64-bit Office:
-
You must be running 64-bit Windows. To check, run across Which Windows operating organisation am I running?.
-
Uninstall any 32-bit versions of Office. See Uninstall or remove Role 2010.
-
Make sure whatsoever 3rd-party Office add-ins that you lot rely on are stated as being Office 2010 and 64-bit uniform. Possible backward incompatibility is why, if in dubiety, stay with the 32-flake version.
-
Insert the Office 2010 installation disc.
-
Click Start, > Computer, and right-click in the disc drive where the Office 2010 installation disc was inserted, and select Open.
-
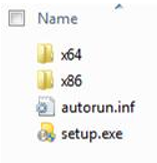
Open the x64 folder in the installation root, then double-click setup.exe.
-
Afterward setup completes, continue by following the default installation instructions, past entering the product central (stride 2).
Install or remove individual Office programs or components
With Office 2010 you can install specific Role apps, or install specific Part components (features).
Install or remove individual Function programs
If y'all simply want to install certain programs from your Office suite - for example, you have Office Abode and Business and want to install Word, Excel, PowerPoint and Outlook but not OneNote – you can choose a custom installation during setup.
-
Initiate the installation of your Part suite.
-
In the Choose the installation you want dialog box, click Customize.
-
On the Installation Options tab, right click the programs that yous exercise not desire installed, and then click
 Not Available.
 -
Click Install now to consummate the custom installation.
Important:You lot tin can't remove Office programs individually afterwards the suite has been installed. You must uninstall Part completely, and so reinstall it using a custom installation post-obit the steps outlined to a higher place.
Install or remove individual Office program components
When you first attempt to use a feature that is not still installed, Part commonly installs the feature automatically.
If the feature that you want is not installed automatically, do the post-obit:
-
Exit all programs.
-
In Microsoft Windows, click the Kickoff button, so click Control Panel.
-
Practise one of the post-obit:
-
Windows vii and Windows Vista Click Programs, and and then click Programs and Features. Click the proper noun of the Microsoft Office suite or plan you lot want to change, and so click Change.
Note:In Archetype view, double-click Programs and Features. Click the name of the Microsoft Office suite or program you want to alter, and and so click Change.
-
Microsoft Windows XP Click Add or Remove Programs, and then click Change or Remove Programs. Click the name of the Microsoft Function suite or program you desire to alter, and then click Change.
Note:In Classic view, double-click Add or Remove Programs, click the proper noun of the Microsoft Function suite or programme you want to modify, and then click Change.
-
-
In the Part Setup dialog box, click Add together or Remove Features, and and then click Next.
-
Click the custom installation options that yous desire:
-
Click a plus sign (+) to aggrandize a folder and see more features.
-
The symbol next to each feature indicates how that feature will be installed past default. You can change how the feature will be installed by clicking its symbol, so selecting another symbol from the listing that appears. The symbols and their meanings are as follows:
 Run from My Figurer The feature will be installed and stored on your hd when you complete Setup. Subfeatures won't exist installed and stored on your hard disk.Run all from My Computer The feature and all of its subfeatures will exist installed and stored on your hard disk when y'all complete Setup.
 Installed on Starting time Use The feature will exist installed on your hard disk when you use the feature for the starting time fourth dimension. At that fourth dimension, y'all may need access to the CD or network server that you originally installed from. This option may not exist bachelor for all features.Not Available The feature won't be installed considering it is not available.
 -
If a feature has sub-features, a symbol with a white groundwork indicates that the feature and all of its sub-features have the same installation method. A symbol with a gray background indicates that the characteristic and its sub-features have a combination of installation methods.
-
You can also utilize the keyboard to scan through features and change feature options. Use the Up Pointer and DOWN Pointer keys to select features. Employ the RIGHT ARROW key to expand a characteristic that contains one or more than sub-features. Use the LEFT ARROW key to collapse an expanded feature. When you have selected the feature that you want to change, printing SPACEBAR to brandish the carte du jour of setup choices. Utilise the UP ARROW and DOWN ARROW keys to select the setup option that yous desire, and and then press ENTER.
-
-
When you lot are done choosing the custom installation options that y'all want, do one of the following:
-
Click Upgrade. This push button appears if Setup detects an earlier version of the aforementioned Office program on your computer.
-
Click Install Now. This button appears if Setup does not notice an before version of the aforementioned Office program on your computer.
-
Encounter Too
Uninstall Office from a PC
Source: https://support.microsoft.com/en-us/office/install-office-2010-1b8f3c9b-bdd2-4a4f-8c88-aa756546529d
Posted by: woolridgerentiold.blogspot.com
0 Response to "How To Reinstall Windows Office 2010"
Post a Comment